内容概要
通过派生class UK2Node和class SGraphNodeK2Base,为蓝图添加自定义节点,实现一个“动态添加/删除输入Pin”的蓝图节点。
【欢迎转载,请注明作者:景夫,原文出处:做游戏的景夫】
通过本系列文章上篇的介绍,我们已经可以创建一个“没什么用”的蓝图节点了。要想让它有用,关键还是上篇中说的典型应用场景:动态添加Pin,这篇博客就来解决这个问题。
目标
和上篇一样,我还将通过一个尽量简单的节点,来说明”可动态/删除添加Pin的蓝图节点“的实现过程,让大家尽量聚焦在“蓝图自定义节点”这个主题上。
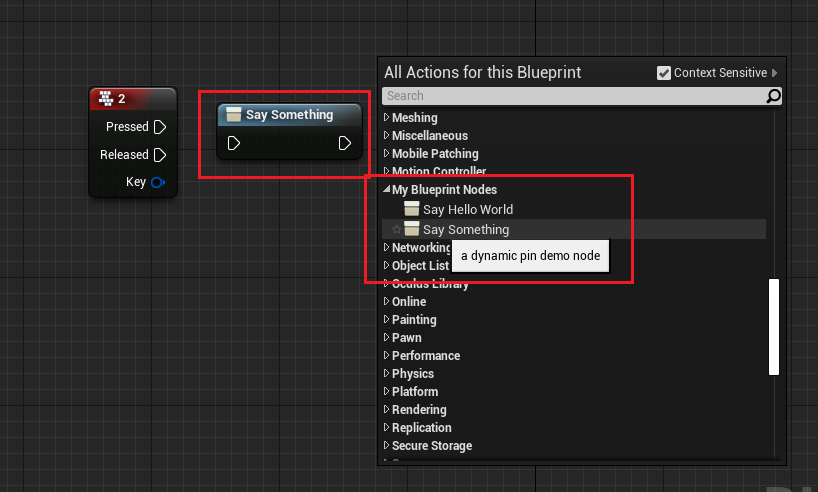
设想这样一个节点:Say Something,把输入的N个字符串连接起来,然后打印输出。也就是说,这个节点的输入Pin是可以动态添加的。我们将在上篇的那个工程基础上实现这个自定义节点。最终实现的效果如下图所示:

下面我们还是来仔细的过一遍实现步骤吧!
创建Blueprint Graph节点类型
首先,我们还是需要创建一个class UK2Node的派生类,这个过程在上篇中已经详细说过了,照单炒菜,很容易就创建了下图这样一个空的自定义节点,这里就不赘述了。不清楚的话,可以返回去在照着上篇做就好了。

创建自定义的节点Widget
我们要动态增加Pin的话,需要在节点上显示一个”加号按钮“,点击之后增加一个“input pin”。这就不能使用默认的Blueprint Graph Node Widget了,需要对其进行扩展。这个扩展的思路和前面一样,也是找到特定的基类,重载其虚函数即可,这个基类就是class SGraphNodeK2Base。我们要重载的两个核心的函数是:
- CreateInputSideAddButton(),创建我们需要的添加输入Pin的按钮;
- OnAddPin(),响应这个按钮的操作;
来看一下最简化的代码吧: SGraphNodeSaySomething.h
class SGraphNodeSaySomething : public SGraphNodeK2Base
{
public:
	SLATE_BEGIN_ARGS(SGraphNodeSaySomething){}
	SLATE_END_ARGS()

	void Construct(const FArguments& InArgs, UBPNode_SaySomething* InNode);
protected:
	virtual void CreateInputSideAddButton(TSharedPtr<SVerticalBox> InputBox) override;
	virtual FReply OnAddPin() override;
};
SGraphNodeSaySomething.cpp
void SGraphNodeSaySomething::Construct(const FArguments& InArgs, UBPNode_SaySomething* InNode)
{
	this->GraphNode = InNode;
	this->SetCursor( EMouseCursor::CardinalCross );
	this->UpdateGraphNode();
}

void SGraphNodeSaySomething::CreateInputSideAddButton(TSharedPtr<SVerticalBox> InputBox)
{
	FText Tmp = FText::FromString(TEXT("Add word"));
	TSharedRef<SWidget> AddPinButton = AddPinButtonContent(Tmp, Tmp);

	FMargin AddPinPadding = Settings->GetInputPinPadding();
	AddPinPadding.Top += 6.0f;

	InputBox->AddSlot()
	.AutoHeight()
	.VAlign(VAlign_Center)
	.Padding(AddPinPadding)
	[
		AddPinButton
	];
}

FReply SGraphNodeSaySomething::OnAddPin()
{ }
如果你接触过Unreal Slate的话,上面这个Slate Widget的代码很容易看懂啦,如果你没有玩过Slate。。。。Slate是虚幻自己的一套 Immediate Mode UI framework,建议先过一下官方文档。
最后,因为这个基类:SGraphNodeK2Base,属于GraphEditor模块,所以要修改MyBlueprintNodeEditor.Build.cs,把它添加到PrivateDependencyModuleNames:
PrivateDependencyModuleNames.AddRange(new string[] {
            "UnrealEd",
            "GraphEditor",
            "BlueprintGraph",
            "KismetCompiler",
            "MyBlueprintNode"
        });
扩展蓝图编辑器的节点Widget
OK,上面我们已经创建了两个类,分别是:
- class UBPNode_SaySomething : public UK2Node
- class SGraphNodeSaySomething : public SGraphNodeK2Base
下面我们就需要让蓝图编辑器知道:创建UBPNode_SaySomething对象的时候,需要使用SGraphNodeSaySomething这个Widget。
添加自定义Node Widget的两种方式(参见引擎源码class FNodeFactory):
- 重载UEdGraphNode::CreateVisualWidget()函数,例如:
TSharedPtr<SGraphNode> UNiagaraNode::CreateVisualWidget() { return SNew(SNiagaraGraphNode, this); } - 使用 class FEdGraphUtilities 注册 class FGraphPanelNodeFactory对象,例如:
void FBehaviorTreeEditorModule::StartupModule()
{
 GraphPanelNodeFactory_BehaviorTree = MakeShareable( new FGraphPanelNodeFactory_BehaviorTree() );
 FEdGraphUtilities::RegisterVisualNodeFactory(GraphPanelNodeFactory_BehaviorTree);
}
在这里,我们使用第一种方式,也就是在class UBPNode_SaySomething中重载父类的虚函数CreateVisualWidget()。
TSharedPtr<SGraphNode> UBPNode_SaySomething::CreateVisualWidget() {
	return SNew(SGraphNodeSaySomething, this);
}
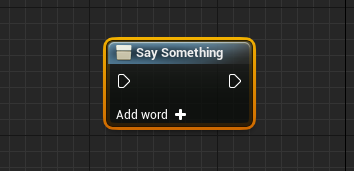
完成上述代码之后,运行蓝图编辑器,添加Say Something节点,就可以看到这个Widget了:

动态增加Pin
当用户点击“Add Word +”按钮时,SGraphNodeSaySomething::OnAddPin()会被调用,下面是它的实现代码:
FReply SGraphNodeSaySomething::OnAddPin()
{
	UBPNode_SaySomething* BPNode = CastChecked<UBPNode_SaySomething>(GraphNode);

	const FScopedTransaction Transaction(NSLOCTEXT("Kismet", "AddArgumentPin", "Add Argument Pin"));
	BPNode->Modify();

	BPNode->AddPinToNode();
	FBlueprintEditorUtils::MarkBlueprintAsModified(BPNode->GetBlueprint());

	UpdateGraphNode();
	GraphNode->GetGraph()->NotifyGraphChanged();

	return FReply::Handled();
}
上面这段代码主要是响应用户的UI操作,添加Pin的核心操作,还是放在UBPNode_SaySomething::AddPinToNode()这个函数里面去实现的:
void UBPNode_SaySomething::AddPinToNode()
{
	TMap<FString, FStringFormatArg> FormatArgs= {
			{TEXT("Count"), ArgPinNames.Num()}
	};
	FName NewPinName(*FString::Format(TEXT("Word {Count}"), FormatArgs));
	ArgPinNames.Add(NewPinName);

	CreatePin(EGPD_Input, UEdGraphSchema_K2::PC_String, NewPinName);
}
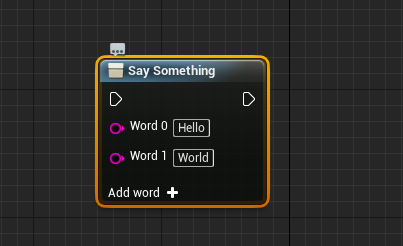
现在我们就可以在蓝图编辑器里面操作添加输入Pin了 :

动态删除Pin
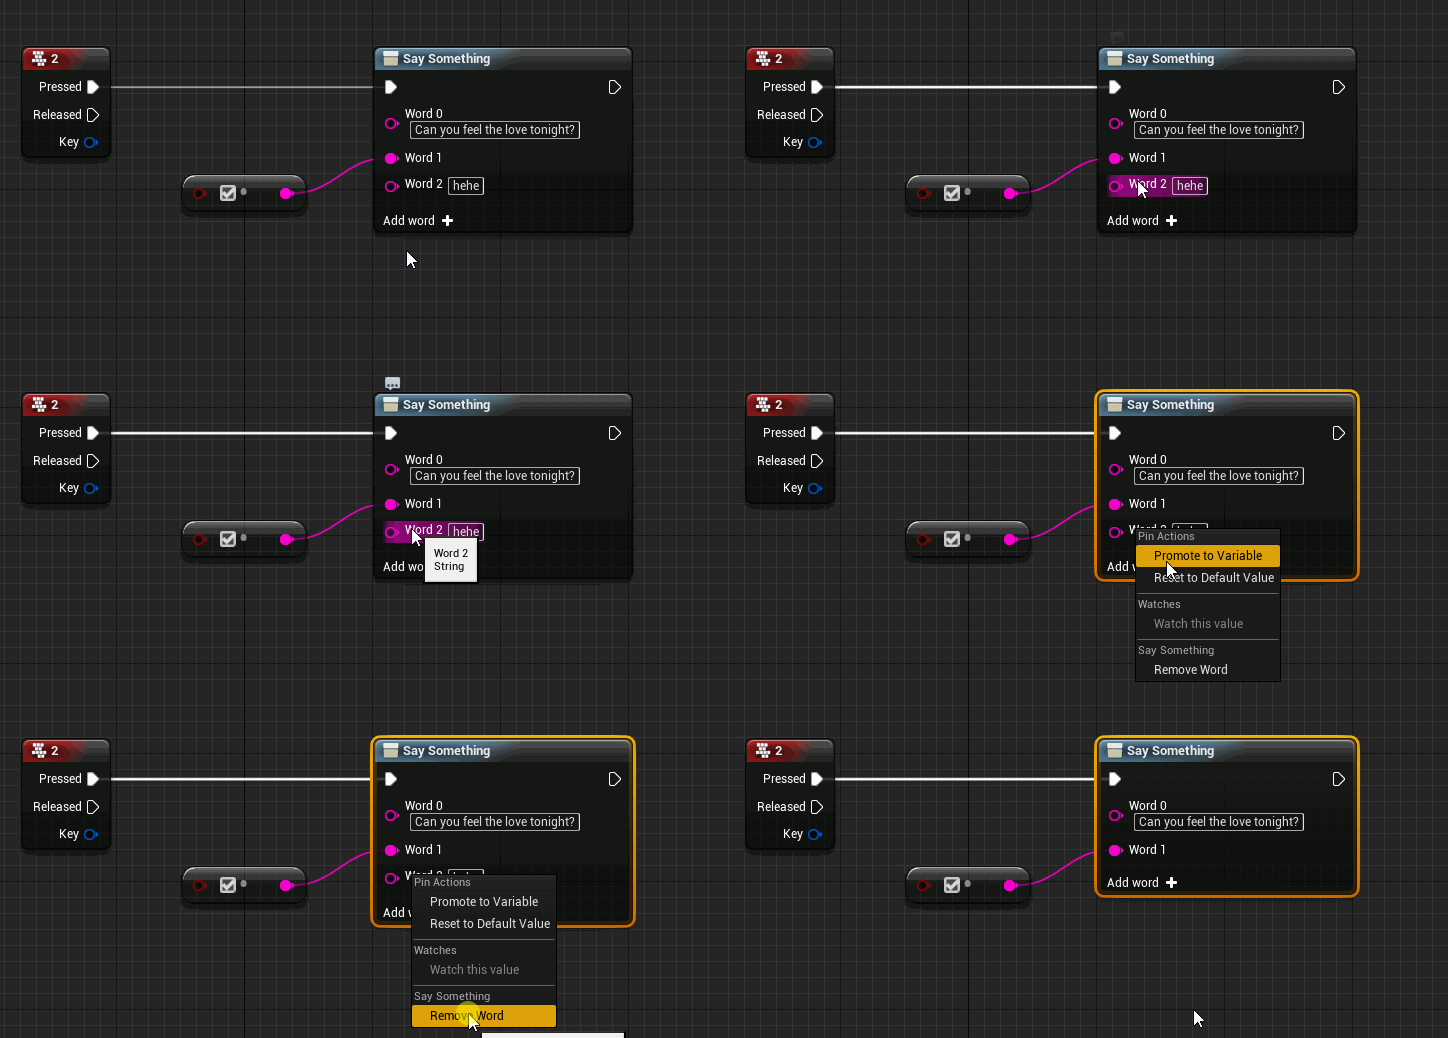
如果用户想要删除某个输入变量Pin,他需要在那个Pin上点击鼠标右键,呼出Context Menu,选择“删除”菜单项将其移除。下面我们就看看这个操作是如何实现的。

我们可以通过重载void UEdGraphNode::GetContextMenuActions(const FGraphNodeContextMenuBuilder& Context) const来定制Context Menu。
void UBPNode_SaySomething::GetContextMenuActions(const FGraphNodeContextMenuBuilder & Context) const
{
	Super::GetContextMenuActions(Context);

	if (Context.bIsDebugging)
		return;

	Context.MenuBuilder->BeginSection("UBPNode_SaySomething", FText::FromString(TEXT("Say Something")));

	if (Context.Pin != nullptr)
	{
		if (Context.Pin->Direction == EGPD_Input && Context.Pin->ParentPin == nullptr)
		{
			Context.MenuBuilder->AddMenuEntry(
				FText::FromString(TEXT("Remove Word")),
				FText::FromString(TEXT("Remove Word from input")),
				FSlateIcon(),
				FUIAction(
					FExecuteAction::CreateUObject(this, &UBPNode_SaySomething::RemoveInputPin, const_cast<UEdGraphPin*>(Context.Pin))
				)
			);
		}
	}// end of if

	Context.MenuBuilder->EndSection();
}
这个函数的实现很直白啦,就是操作MenuBuilder,添加菜单项,并绑定UIAction到成员函数UBPNode_SaySomething::RemoveInputPin,接下来就是实现这个函数了。
void UBPNode_SaySomething::RemoveInputPin(UEdGraphPin * Pin)
{
	FScopedTransaction Transaction(FText::FromString("SaySomething_RemoveInputPin"));
	Modify();

	ArgPinNames.Remove(Pin->GetFName());

	RemovePin(Pin);
	FBlueprintEditorUtils::MarkBlueprintAsStructurallyModified(GetBlueprint());
}
也很简单,就是直接调用父类的RemovePin(),并同步处理一下自己内部的状态变量就好了。
实现这个蓝图节点的编译
通过前面的步骤,蓝图编辑器的扩展就全部完成了,接下来就是最后一步了,通过扩展蓝图编译过程来实现这个节点的实际功能。
我们延续上篇的思路来实现这个节点的功能,也就是重载UK2Node::ExpandNode()函数。
核心的问题是如何把当前的所有的输入的Pin组合起来? 答案很简单,把所有输入的Pin做成一个TArray«FString»,这样就可以传入到一个UFunction来调用。
首先我们在 class UMyBlueprintFunctionLibrary 中添加一个函数:
UCLASS()
class MYBLUEPRINTNODE_API UMyBlueprintFunctionLibrary : public UBlueprintFunctionLibrary
{
	GENERATED_BODY()

public:
	UFUNCTION(BlueprintCallable, meta = (BlueprintInternalUseOnly = "true"))
		static void SaySomething_Internal(const TArray<FString>& InWords);
};
然后,仍然与上篇相同,使用一个 class UK2Node_CallFunction 节点实例对象来调用这个UFunction,不同的是,我们需要使用一个 class UK2Node_MakeArray 节点的实例来把收集所有的动态生成的输入Pin。下面是实现的代码:
void UBPNode_SaySomething::ExpandNode(FKismetCompilerContext & CompilerContext, UEdGraph * SourceGraph) {
	Super::ExpandNode(CompilerContext, SourceGraph);

	UEdGraphPin* ExecPin = GetExecPin();
	UEdGraphPin* ThenPin = GetThenPin();
	if (ExecPin && ThenPin) {

		// create a CallFunction node
		FName MyFunctionName = GET_FUNCTION_NAME_CHECKED(UMyBlueprintFunctionLibrary, SaySomething_Internal);

		UK2Node_CallFunction* CallFuncNode = CompilerContext.SpawnIntermediateNode<UK2Node_CallFunction>(this, SourceGraph);
		CallFuncNode->FunctionReference.SetExternalMember(MyFunctionName, UBPNode_SaySomething::StaticClass());
		CallFuncNode->AllocateDefaultPins();

		// move exec pins
		CompilerContext.MovePinLinksToIntermediate(*ExecPin, *(CallFuncNode->GetExecPin()));
		CompilerContext.MovePinLinksToIntermediate(*ThenPin, *(CallFuncNode->GetThenPin()));

		// create a "Make Array" node to compile all args
		UK2Node_MakeArray* MakeArrayNode = CompilerContext.SpawnIntermediateNode<UK2Node_MakeArray>(this, SourceGraph);
		MakeArrayNode->AllocateDefaultPins();

		// Connect Make Array output to function arg
		UEdGraphPin* ArrayOut = MakeArrayNode->GetOutputPin();
		UEdGraphPin* FuncArgPin = CallFuncNode->FindPinChecked(TEXT("InWords"));
		ArrayOut->MakeLinkTo(FuncArgPin);

		// This will set the "Make Array" node's type, only works if one pin is connected.
		MakeArrayNode->PinConnectionListChanged(ArrayOut);

		// connect all arg pin to Make Array input
		for (int32 i = 0; i < ArgPinNames.Num(); i++) {

			// Make Array node has one input by default
			if (i > 0)
				MakeArrayNode->AddInputPin();

			// find the input pin on the "Make Array" node by index.
			const FString PinName = FString::Printf(TEXT("[%d]"), i);
			UEdGraphPin* ArrayInputPin = MakeArrayNode->FindPinChecked(PinName);

			// move input word to array
			UEdGraphPin* MyInputPin = FindPinChecked(ArgPinNames[i], EGPD_Input);
			CompilerContext.MovePinLinksToIntermediate(*MyInputPin, *ArrayInputPin);
		}// end of for
	}

	// break any links to the expanded node
	BreakAllNodeLinks();
}
核心步骤来讲解一下:
- 创建了一个class UK2Node_CallFunction的实例,然后把自身节点的两端的Exec Pin重定向到这个Node的两端;
- 使用“函数参数名称”找到UK2Node_CallFunction节点的输入Pin,把它连接到一个新建的UK2Node_MakeArray的节点实例上;
- 把自己所有的输入变量Pin重定向到UK2Node_MakeArray的输入上(需要为它动态添加新的Pin);
结束语
今天涉及到的class稍微有点多,我整理了一个UML静态结构图,看看这几个classes直接的关系以及它们所在的模块。完整源代码仍然是在我的GitHub:https://github.com/neil3d/UnrealCookBook/tree/master/MyBlueprintNode
至此,通过派生class UK2Node和class SGraphNodeK2Base来扩展Blueprint Graph Editor,我们可以自己定义蓝图节点,以及编辑器中的Node Widget,可以添加按钮,以及其他任何你想要做的东西。通过这个定制化的Node Widget,可以实现编辑时对Blueprint Graph Node的交互控制。至此,我们已经掌握了最强大的蓝图节点的扩展方法。动态添加Pin这个问题说明白之后,下篇将写什么呢?先卖个关子,且待下回分解吧~
Written on September 1st , 2019 by 景夫