内容概要
这篇博客主要是深入理解蓝图整个流程的的底层机制,包括节点编辑、编译、字节码解释执行。理解了这些,对前面几篇所讲的蓝图扩展,可以有一个更清晰的认识
【欢迎转载,请注明作者:景夫,原文出处:做游戏的景夫】
前面几篇博客谈了几种常用的蓝图扩展方式,其中也对蓝图的底层机制进行了部分的解析,但是还不够整体。这篇文章谈一下目前我对蓝图技术架构的系统性的理解,包括蓝图从编辑到运行的整个过程。
蓝图的发展历程
蓝图是一个突破性的创新,它能够让游戏设计师亲手创造自己想要的“游戏体验”。使用可视化编程的方式,可以大大的加速那种“以体验为核心”的游戏开发的迭代速度,这是一次大胆的尝试,也是一次成功的尝试!(蓝图对于国内流行的那种“以数值成长为核心,以挖坑为目的”的游戏开发,可能没有那么大的意义)
就像很多其他的创新一样,它也是有一个渐进的过程的。它的萌芽就是Unreal Engine 3时代的Kismet。在Unreal Engine 3中,Unreal Script还是主要开发语言,但是可以使用Kismet为关卡添加可视化的事件处理脚本,类似于今天的Level Blueprint。
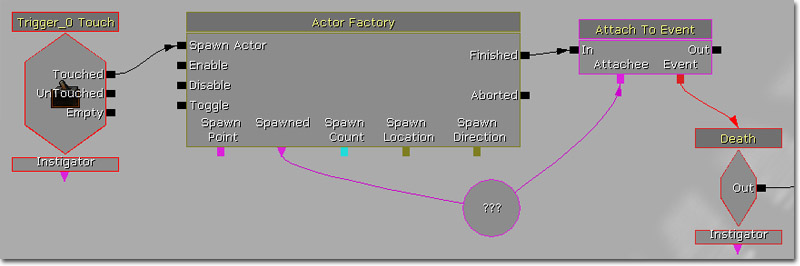
Unreal Engine 3 官方文档:Kismet Visual Scripting
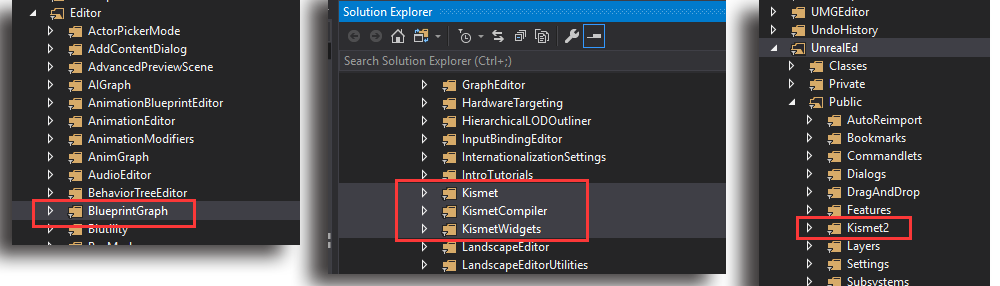
Blueprint 这个名字很可能是UE4开发了一大半之后才定的。这就是为啥UE4源码里面那么多蓝图相关的模块都以Kismet命名,连蓝图节点的基类也是class UK2Node啦,又有少量模块用的是Blueprint这个名字,其实指代的都是同一系统。
以实例理解蓝图的整个机制
这篇博客的目的是把蓝图的整个体系结构完整的梳理一遍,但是如果只是讲抽象的框架的,会很枯燥,所以我打算以“案例分析”的方式,从一个最简单的蓝图入手,讲解每一步的实际机制是怎样的。
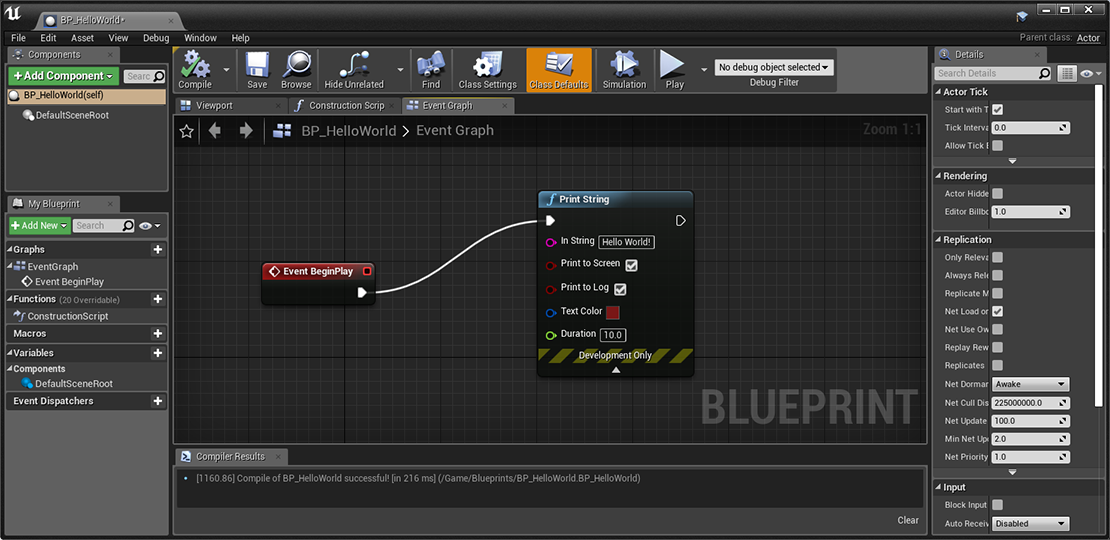
这个案例很简单
- 新建一个从Actor派生的蓝图
- 在它的Event Graph中,编辑BeginPlay事件,调用PrintString,显示一个Hello World!
我尽量细的讲一下我这个案例涉及到的每一步的理解!
新建蓝图:BP_HelloWorld
这个过程的核心是创建了一个 class UBlueprint 对象的实例,这个对象在编辑器中可以被作为一种Asset Object来处理。class UBlueprint是一个class UObject的派生类。理论上任何UObject都可以成为一个Asset Object,它的创建、存储、对象引用关系等都遵循Unreal的资源管理机制。
具体到代码的话:当我们在编辑器中新建一个蓝图的时候,Unreal Editor会调用UBlueprintFactory::FactoryCreateNew()来创建一个新的class UBlueprint对象;
UObject* UBlueprintFactory::FactoryCreateNew(UClass* Class, UObject* InParent, FName Name, EObjectFlags Flags, UObject* Context, FFeedbackContext* Warn, FName CallingContext)
{
    	// ......
    	// 略去非主干流程代码若干
    	// ......

		UClass* BlueprintClass = nullptr;
		UClass* BlueprintGeneratedClass = nullptr;

		IKismetCompilerInterface& KismetCompilerModule = FModuleManager::LoadModuleChecked<IKismetCompilerInterface>("KismetCompiler");
		KismetCompilerModule.GetBlueprintTypesForClass(ParentClass, BlueprintClass, BlueprintGeneratedClass);

		return FKismetEditorUtilities::CreateBlueprint(ParentClass, InParent, Name, BPTYPE_Normal, BlueprintClass, BlueprintGeneratedClass, CallingContext);
}

/** Create a new Blueprint and initialize it to a valid state. */
UBlueprint* FKismetEditorUtilities::CreateBlueprint(UClass* ParentClass, UObject* Outer, const FName NewBPName, EBlueprintType BlueprintType,
            TSubclassOf<UBlueprint> BlueprintClassType, TSubclassOf<UBlueprintGeneratedClass> BlueprintGeneratedClassType, FName CallingContext)
{
	// ......
  	// 略去细节处理流程代码若干
  	// ......

	// Create new UBlueprint object
	UBlueprint* NewBP = NewObject<UBlueprint>(Outer, *BlueprintClassType, NewBPName, RF_Public | RF_Standalone | RF_Transactional | RF_LoadCompleted);
	NewBP->Status = BS_BeingCreated;
	NewBP->BlueprintType = BlueprintType;
	NewBP->ParentClass = ParentClass;
	NewBP->BlueprintSystemVersion = UBlueprint::GetCurrentBlueprintSystemVersion();
	NewBP->bIsNewlyCreated = true;
	NewBP->bLegacyNeedToPurgeSkelRefs = false;
	NewBP->GenerateNewGuid();

  	// ......
  	// 后面还有一些其他处理
  	// . Create SimpleConstructionScript and UserConstructionScript
	// . Create default event graph(s)
	// . Create initial UClass
  	// ......
}
详见引擎相关源代码:
- class UBlueprint: Source/Runtime/Engine/Classes/Engine/Blueprint.h
- class UBlueprintFactory:Source/Editor/UnrealEd/Classes/Factories/BlueprintFactory.h
- class FKismetEditorUtilities: Source/Editor/UnrealEd/Public/Kismet2/KismetEditorUtilities.h
另外,这个操作还创建了一个class UPackage对象,作为class UBlueprint对象的Outer对象,这个我在后面“保存蓝图”那一小节再展开。
双击打开BP_HelloWorld
当我们在Content Browser中双击一个“BP_HelloWorld”这个蓝图时,Unreal Editor会启动蓝图编辑器,它是一个独立编辑器(Standalone Editor),这个操作是Asset Object的标准行为,就像Material、Texture等对象一样。
Unreal Editor通过管理AssetTypeAction来实现上述功能。具体到蓝图的话,有一个class FAssetTypeActions_Blueprint,它实现了class UBlueprint所对应的AssetTypeActions。启动蓝图编辑器这个操作,就是通过:FAssetTypeActions_Blueprint::OpenAssetEditor()来实现的
class ASSETTOOLS_API FAssetTypeActions_Blueprint : public FAssetTypeActions_ClassTypeBase
{
public:
	virtual void OpenAssetEditor(const TArray<UObject*>& InObjects, TSharedPtr<class IToolkitHost> EditWithinLevelEditor = TSharedPtr<IToolkitHost>()) override;
};
这个函数它则调用“Kismet”模块,生成、初始化一个IBlueprintEditor实例,也就是我们天天在用的蓝图编辑器。
void FAssetTypeActions_Blueprint::OpenAssetEditor( const TArray<UObject*>& InObjects, TSharedPtr<IToolkitHost> EditWithinLevelEditor )
{
	EToolkitMode::Type Mode = EditWithinLevelEditor.IsValid() ? EToolkitMode::WorldCentric : EToolkitMode::Standalone;

	for (UObject* Object : InObjects)
	{
		if (UBlueprint* Blueprint = Cast<UBlueprint>(Object))
		{
				FBlueprintEditorModule& BlueprintEditorModule = FModuleManager::LoadModuleChecked<FBlueprintEditorModule>("Kismet");
				TSharedRef< IBlueprintEditor > NewKismetEditor = BlueprintEditorModule.CreateBlueprintEditor(Mode, EditWithinLevelEditor, Blueprint, ShouldUseDataOnlyEditor(Blueprint));
		}
	}
}
详见引擎相关源代码:
- class FAssetTypeActions_Blueprint:Source/Developer/AssetTools/Public/AssetTypeActions/AssetTypeActions_Blueprint.h
- class FBlueprintEditorModule: Source/Editor/Kismet/BlueprintEditorModule.h
- class IBlueprintEditor: Source/Editor/Kismet/BlueprintEditorModule.h
添加节点:PrintString
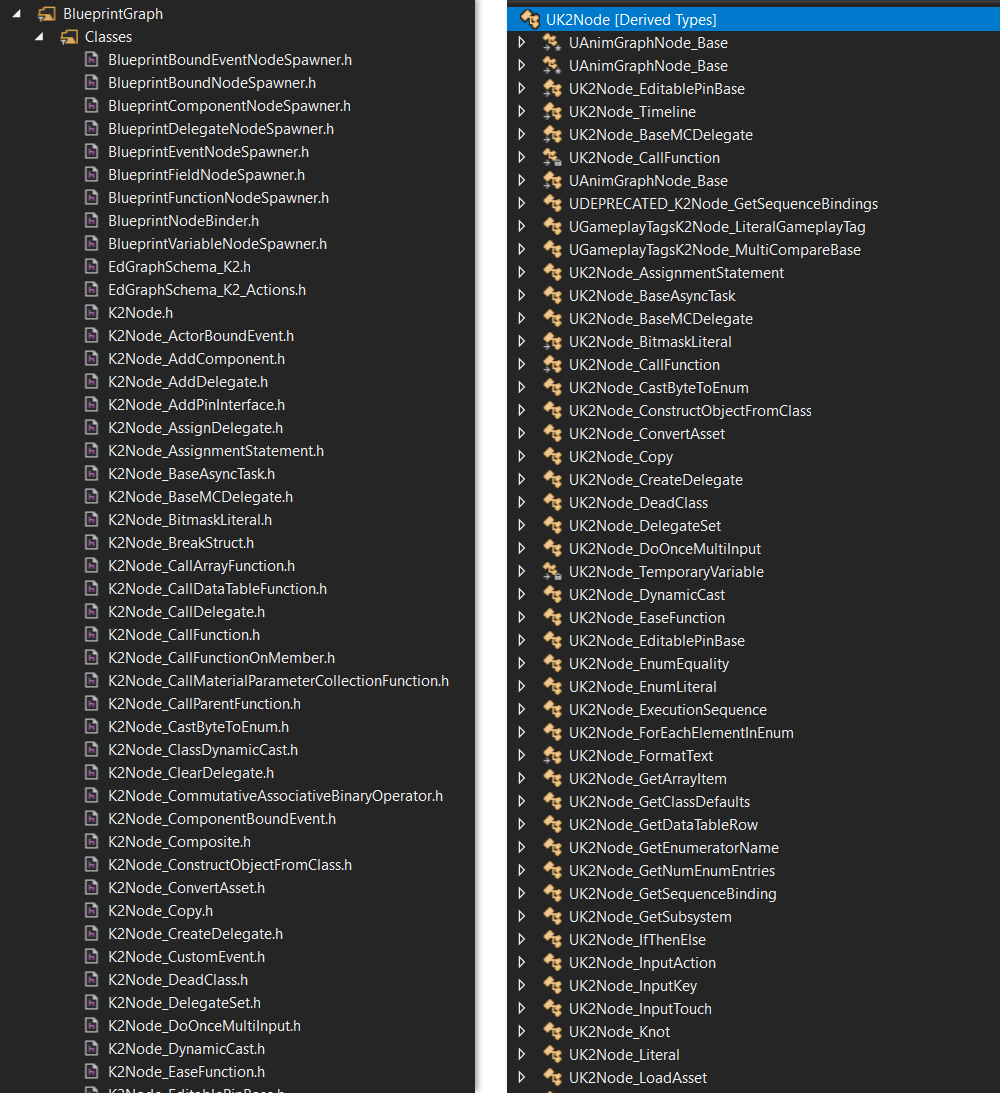
我们在蓝图编辑器里面的每放入一个蓝图节点,就会对应的生成一个class UEdGraphNode的派生类对象,例如前面一篇博客介绍的里面自己所实现的:class UBPNode_SaySomething : public UK2Node(你猜对了:UK2Node是从UEdGraphNode派生的)。UEdGraphNode会管理多个“针脚”,也就是class UEdGraphPin对象。编辑蓝图的过程,主要就是就是创建这些对象,并连接/断开这些针脚对象等。引擎中有一批核心的class UK2Node的派生类,也就是引擎默认提供的那些蓝图节点,具体见下图:
详见引擎相关源代码:
- UEdGraph相关代码目录:Source/Runtime/Engine/Classes/EdGraph
- 引擎提供的蓝图节点相关代码目录:Source/Editor/BlueprintGraph/Class
对于我们这个例子来说,新添加的“PrintString”这个节点,是创建的一个class UK2Node_CallFunction的实例,它是class UK2Node的派生类。它内部保存了一个UFunction对象指针,指向下面这个函数:
void UKismetSystemLibrary::PrintString(UObject* WorldContextObject, const FString& InString, bool bPrintToScreen, bool bPrintToLog, FLinearColor TextColor, float Duration)
详见:Source/Runtime/Engine/Classes/Kismet/KismetSystemLibrary.h
另外还有一个比较有意思的点是:蓝图编辑器中的Event Graph编辑是如何实现的?我想在这里套用一下“Model-View-Controller”模式:
- 蓝图编辑器管理一个
class UEdGraph对象,这个相当于Model- 其他的基于Graph的编辑器可能使用
class UEdGraph的派生类,例如Material Editor:class UMaterialGraph : public UEdGraph
- 其他的基于Graph的编辑器可能使用
- 它使用
class UEdGraphSchema_K2来定义蓝图Graph的行为,相当于Controller- 这些行为包括:测试Pin之间是否可以连接、创建或删除连接等等
- 它是
class UEdGraphSchema的派生类 - 详见:Source/Editor/BlueprintGraph/Classes/EdGraphSchema_K2.h
- 整体的UI、Node布局等,都是一个复用的
SGraphEditor,相当于View- Graph中的每个Node对应一个可扩展的Widget,可以从
class SGraphNode派生之后添加的SGraphEditor中。对于蓝图来说,它们都是:class SGraphNodeK2Base的派生类 - 详见:Source/Editor/GraphEditor/Public/KismetNodes/SGraphNodeK2Base.h
- Graph中的每个Node对应一个可扩展的Widget,可以从
点击[Compile]按钮:编译蓝图
当点击[Compile]按钮时,蓝图会进行编译。编译的结果就是一个UBlueprintGeneratedClass对象,这个编译出来的对象保存在UBlueprint的父类中:UBlueprintCore::GeneratedClass。
蓝图编译流程的入口函数为:
void FBlueprintEditor::Compile()- 这个函数的核心操作是调用:
void FKismetEditorUtilities::CompileBlueprint(UBlueprint* BlueprintObj, EBlueprintCompileOptions CompileFlags, FCompilerResultsLog* pResults) - 详见:Source/Editor/Kismet/Private/BlueprintEditor.cpp
- 详见:Source/Editor/UnrealEd/Private/Kismet2/Kismet2.cpp
4.21版本之后的,蓝图编译通过FBlueprintCompilationManager异步进行,对于分析蓝图原理来说增加了难度,可以修改项目中的“DefaultEditor.ini”,添加下面两行关闭这一特性。
[/Script/UnrealEd.BlueprintEditorProjectSettings]
bDisableCompilationManager=true
就我们这个例子来说,编译的核心过程如下:
void FKismetCompilerContext::Compile()
{
	CompileClassLayout(EInternalCompilerFlags::None);
	CompileFunctions(EInternalCompilerFlags::None);
}
可见,蓝图编译主要由两部分:Class Layout,以及根据Graph生成相应的字节码。
Class Layout也就是这个蓝图类包含哪些属性(即class UProperty对象),包含哪些函数(即class UFunction对象),主要是通过这两个函数完成:
UProperty* FKismetCompilerContext::CreateVariable(const FName VarName, const FEdGraphPinType& VarType)void FKismetCompilerContext::CreateFunctionList()
下面就看一下蓝图Graph编译生成字节码的过程。首先来分享一个查看蓝图编译结果的方法,我们可以修改工程里面的:DefaultEngine.ini,增加一下两行:
[Kismet]
CompileDisplaysBinaryBackend=true
就可以在OutputLog窗口里看到编译出的字节码,我们这个Hello World编译的Log如下:
BlueprintLog: New page: Compile BP_HelloWorld
LogK2Compiler: [function ExecuteUbergraph_BP_HelloWorld]:
Label_0x0:
     $4E: Computed Jump, offset specified by expression:
         $0: Local variable named EntryPoint
Label_0xA:
     $5E: .. debug site ..
Label_0xB:
     $68: Call Math (stack node KismetSystemLibrary::PrintString)
       $17: EX_Self
       $1F: literal ansi string "Hello"
       $27: EX_True
       $27: EX_True
       $2F: literal struct LinearColor (serialized size: 16)
         $1E: literal float 0.000000
         $1E: literal float 0.660000
         $1E: literal float 1.000000
         $1E: literal float 1.000000
         $30: EX_EndStructConst
       $1E: literal float 2.000000
       $16: EX_EndFunctionParms
Label_0x46:
     $5A: .. wire debug site ..
Label_0x47:
     $6: Jump to offset 0x53
Label_0x4C:
     $5E: .. debug site ..
Label_0x4D:
     $5A: .. wire debug site ..
Label_0x4E:
     $6: Jump to offset 0xA
Label_0x53:
     $4: Return expression
       $B: EX_Nothing
Label_0x55:
     $53: EX_EndOfScript
LogK2Compiler: [function ReceiveBeginPlay]:
Label_0x0:
     $5E: .. debug site ..
Label_0x1:
     $5A: .. wire debug site ..
Label_0x2:
     $5E: .. debug site ..
Label_0x3:
     $46: Local Final Script Function (stack node BP_HelloWorld_C::ExecuteUbergraph_BP_HelloWorld)
       $1D: literal int32 76
       $16: EX_EndFunctionParms
Label_0x12:
     $5A: .. wire debug site ..
Label_0x13:
     $4: Return expression
       $B: EX_Nothing
Label_0x15:
     $53: EX_EndOfScript
在蓝图编译时,会把所有的Event Graph组合形成一个Uber Graph,然后遍历Graph的所有节点,生成一个线性的列表,保存到“TArray<UEdGraphNode*> FKismetFunctionContext::LinearExecutionList”;接着遍历每个蓝图节点,生成相应的“语句”,正确的名词是:Statement,保存到“TMap< UEdGraphNode*, TArray<FBlueprintCompiledStatement*> > FKismetFunctionContext::StatementsPerNode”,一个Node在编译过程中可以产生多个Statement;最后调用FScriptBuilderBase::GenerateCodeForStatement()将Statement转换成字节码,保存到TArray<uint8>UFunction::Script 这个成员变量中。
对于我们这个案例来说,PrintString是使用class UK2Node_CallFunction实现的:
- 它通过
void FKCHandler_CallFunction::CreateFunctionCallStatement(FKismetFunctionContext& Context, UEdGraphNode* Node, UEdGraphPin* SelfPin)来创建一系列的Statement,最重要的是一个“KCST_CallFunction”。 - 最后通过
void FScriptBuilderBase::EmitFunctionCall(FKismetCompilerContext& CompilerContext, FKismetFunctionContext& FunctionContext, FBlueprintCompiledStatement& Statement, UEdGraphNode* SourceNode)来生成蓝图字节码;根据被调用函数的不同,可能转换成以下几种字节码:- EX_CallMath、EX_LocalFinalFunction、EX_FinalFunction、EX_LocalVirtualFunction、EX_VirtualFunction
- 我们这个PrintString调用的是
UKismetSystemLibrary::PrintString(),是EX_FinalFunction
点击[Save]按钮:保存蓝图
这个蓝图保存之后,磁盘上会多出一个“BP_HelloWorld.uasset”文件,这个文件本质上就是UObject序列化的结果,但是有一个细节需要注意一下。
UObject的序列化常用的分为两个部分:
- UPROPERTY的话,会通过反射信息自动由底层进行序列化
- 可以在派生类中重载
void Serialize(FArchive& Ar)函数可以添加定制化的代码 - 对于自定义的Struct,可以实现一套“»”、“«”操作符,以及Serialize()函数
序列化属于虚幻引擎的基础设施,网上这方面相关的帖子很多,这里就不重复了。
值得一提的是,其实这个BP_HelloWorld.uasset并不直接对于class UBlueprint对象,而是对应一个class UPackage对象。Unreal Editor的Asset处理有一个基础流程,在新建Asset对象时,默认会创建一个class UPackage实例,作为这个Asset的Outer对象。
UObject* UAssetToolsImpl::CreateAsset(const FString& AssetName, const FString& PackagePath, UClass* AssetClass, UFactory* Factory, FName CallingContext)
{

	const FString PackageName = UPackageTools::SanitizePackageName(PackagePath + TEXT("/") + AssetName);

	UClass* ClassToUse = AssetClass ? AssetClass : (Factory ? Factory->GetSupportedClass() : nullptr);

  	//! 请注意这里:创建Package对象
	UPackage* Pkg = CreatePackage(nullptr,*PackageName);

	UObject* NewObj = nullptr;
	EObjectFlags Flags = RF_Public|RF_Standalone|RF_Transactional;
	if ( Factory )
	{
    	//! 请注意这里:Pkg作为Outer
		NewObj = Factory->FactoryCreateNew(ClassToUse, Pkg, FName( *AssetName ), Flags, nullptr, GWarn, CallingContext);
	}
	else if ( AssetClass )
	{
    	//! 请注意这里:Pkg作为Outer
		NewObj = NewObject<UObject>(Pkg, ClassToUse, FName(*AssetName), Flags);
	}


	return NewObj;
}
这个Package对象在序列化时,也是作为标准的UObject进入序列化流程,但是它起着一个重要的作用:
- 在整个UObject及其子对象组成的树状结构中,只有最外层(Outermost)的对象是同一个对象时,才会被序列化到一个.uasset文件中
- 详见:UPackage* UObjectBaseUtility::GetOutermost() const
这样就巧妙的解决了序列化时,如何判断对象之间的关系是聚合、还是链接的问题!我们来考虑另外一个例子:class UStaticMeshComponent:你可以想象一下,当Level中具有一个AStaticMeshActor,它包含UStaticMeshComponent,其静态模型是引用的另外一个UStaticMesh对象,那么序列化的过程是怎么样的呢?
- 如果UStaticMesh对象序列进入Component、Actor,以至于进入Level,那就不对啦!因为一个静态模型可能在关卡中放置多个实例,如果每个都保存一遍,那就不只是浪费资源了,而是个错误的设计啦!
- 在引擎中,因为UStaticMesh对象是保存在另外一个.uasset文件中,也就是说它的Outermost对象是另外一个Package,所以在UStaticMeshComponent序列化的时候,它是通过“路径链接”的方式记录的,而不是完整对象!
把BP_HelloWorld拖放到关卡中
因为BP_HelloWorld是一个从Actor派生的,所以它可以添加到关卡中。当我们吧BP_HelloWorld拖放到窗口中的时候,和C++创建的Actor派生类一样,其核心操作都调用了AActor* UWorld::SpawnActor( UClass* Class, FTransform const* UserTransformPtr, const FActorSpawnParameters& SpawnParameters )来创建一个新的class AActor派生类对象。对于我们这个例子来说,第一个参数UClass *Class是一个UBlueprintGeneratedClass对象,也就是前面我们是的蓝图编译产生的那个UBlueprintGeneratedClass。
点击[Play]按钮:运行蓝图
下面我们就看看这个蓝图在关卡运行时的调用过程。首先,BP_HelloWorld是一个标准的Actor,但是它的BeginPlay事件和C++的Actor派生类重载BeginPlay()实现又有差别。下面我们就先看一下这个事件节点,然后再从字节码解释执行的层面看看PrintString节点是如何被调用的。
BeginPlay事件:AActor::ReceiveBeginPlay()
蓝图编辑器中的BeginPlay事件节点对应的并不是AActor::BeginPlay(),而是AActor::ReceiveBeginPlay()这个事件,我们看一下它的声明:
/** Event when play begins for this actor. */
UFUNCTION(BlueprintImplementableEvent, meta=(DisplayName = "BeginPlay"))
void ReceiveBeginPlay();
从这个声明可以看出:
DisplayName = "BeginPlay",它只是看上去叫做“BeginPlay”,但是和AActor::BeginPlay()函数是两个东西。AActor::BeginPlay()是C++的实现,并在里面调用了ReceiveBeginPlay();- ReceiveBeginPlay()是一个“用蓝图实现的事件”,这种函数我们不需要使用C++写它的函数体。
- ReceiveBeginPlay()的函数体由UBT生成。生成的代码如下:
static FName NAME_AActor_ReceiveBeginPlay = FName(TEXT("ReceiveBeginPlay"));
void AActor::ReceiveBeginPlay()
{
	ProcessEvent(FindFunctionChecked(NAME_AActor_ReceiveBeginPlay),NULL);
}
这段自动生成的代码实际上是做了两件事:
- 找到名为“ReceiveBeginPlay”的UFunction对象;
- 执行“ProcessEvent”函数。
我们先来看一下这个“FindFunctionChecked()”操作,它的调用过程如下:
- UObject::FindFunctionChecked(),this==BP_MyActor对象实例
- UObject::FindFunction(),其实现为:
GetClass()->FindFunctionByName(InName)- UClass::FindFunctionByName(),this==BP_MyActor的UClass对象实例;在这个例子中,this的类型为UClass的子类:UBlueprintGeneratedClass;
- 上述函数就返回了“ReceiveBeginPlay”对应的一个UFunction对象指针;
- UObject::FindFunction(),其实现为:
在这个例子中,返回的UFunction对象,对应的就是一个“Kismet callable function”(代码注释里的说法),或者是说“蓝图函数”,其字节码就定义在在它的父类UStruct上: TArray<uint8> UStruct::Script。在蓝图编辑器中拉的那个Graph。
接下来,这个UFunction对象作为参数,调用了“AActor::ProcessEvent()”函数,这个函数是父类:UObject::ProcessEvent()的一个简单封装。后者就是蓝图字节码解释执行的部分了!
蓝图字节码的解释执行
首先我们看一下蓝图的字节码长什么样子吧。 在CoreUObject/Public/UObject/Script.h这个文件中有一个enum EExprToken,这个枚举就是蓝图的字节码定义。如果学过汇编语言、JAVA VM或者.Net CLR IL的话,对这些东西并不会陌生:
//
// Evaluatable expression item types.
//
enum EExprToken
{
  ...
  EX_Return = 0x04,	// Return from function.
  EX_Jump = 0x06,	// Goto a local address in code.
  EX_JumpIfNot  = 0x07,	// Goto if not expression.
  EX_Let  = 0x0F,	// Assign an arbitrary size value to a variable.

  EX_LocalVirtualFunction = 0x45, // Special instructions to quickly call a virtual function that we know is going to run only locally
  EX_LocalFinalFunction = 0x46, // Special instructions to quickly call a final function that we know is going to run only locally
  ...
};
这些字节码又是怎样被解释执行的呢?这部分功能完全是由UObject这个巨大的基类来完成的,引擎并没有一个单独的Blueprint VM之类的模块。这个不必吐槽,这是Unreal的传统,从Unreal第一代的Unreal Script就是这样的。引擎中使用一个全局查找表,把上述字节码映射到函数指针。在运行时,从一个字节码数组中逐个取出字节码,并查找函数指针,进行调用,也就完成了所谓的“字节码解释执行”的过程。
具体的说,引擎定义了一个全局变量:FNativeFuncPtr GNatives[EX_Max],它保存了一个“字节码到FNativeFuncPtr的查找表。在引擎中通过DEFINE_FUNCTION、IMPLEMENT_VM_FUNCTION来定义蓝图字节码对应的C++函数,并注册到这个全局映射表中,例如字节码“EX_Jump”对应的函数:
DEFINE_FUNCTION(UObject::execJump)
{
	CHECK_RUNAWAY;

	// Jump immediate.
	CodeSkipSizeType Offset = Stack.ReadCodeSkipCount();
	Stack.Code = &Stack.Node->Script[Offset];
}
IMPLEMENT_VM_FUNCTION( EX_Jump, execJump );
字节码解释执行的过程在ProcessLocalScriptFunction()函数中。它使用一个循环 while (*Stack.Code != EX_Return)从当前的栈上取出每个字节码,也就是UFunction对象中的那个TArray<uint8> Script成员中的每个元素,解释字节码的代码十分直观:
void FFrame::Step(UObject* Context, RESULT_DECL)
{
	int32 B = *Code++;
	(GNatives[B])(Context,*this,RESULT_PARAM);
}
详见相关引擎源码:
- CoreUObject/Public/UObject/Script.h
- CoreUObject/Private/UObject/ScriptCore.h
Hello World的执行
在我们这个例子中,这个函数做了以下几件核心的事情:
- 创建了一个 FFrame 对象,这个对象就是执行这个UFunction所需要的的“栈”对象,他内部保存了一个
uint8* Code指针,相当于汇编语言的PC,指向当前需要的字节码; - 调用这个
UFunction::Invoke(),this就是刚才找到的那个代表ReceiveBeginPlay的UFunction对象; - 调用
ProcessLocalScriptFunction()函数,解释执行字节码。
我们的PrintString对应的字节码是EX_FinalFunction,最终通过下面这个函数来实现。
DEFINE_FUNCTION(UObject::execFinalFunction)
{
	// Call the final function.
	P_THIS->CallFunction( Stack, RESULT_PARAM, (UFunction*)Stack.ReadObject() );
}
IMPLEMENT_VM_FUNCTION( EX_FinalFunction, execFinalFunction );
它内部通过void UFunction::Invoke(UObject* Obj, FFrame& Stack, RESULT_DECL)调用到UKismetSystemLibrary::PrintString()。
小结一下
OK,罗里吧嗦说了这么多,下面让我们用简练的语言概述一下上面所有内容:
- 蓝图首先作为一种引擎的Asset对象,可以被Unreal Editor的Asset机制所管理,并且可以被Blueprint Editor来编辑;
- 在Blueprint Editor中,蓝图的Event Graph以
class UEdGraph对象的方式被Graph Editor来编辑; - 蓝图通过编译过程,生成一个UClass的派生类对象,即UBlueprintGeneratedClass对象实例;这个实例对象就像C++的UObject派生类对应的UClass那样,拥有UProperty和UFunction;
- 与C++生成的UClass不同的是,这些UFunction可能会使用蓝图字节码;
- 在运行时,并不存在一个单独的“蓝图虚拟机”模块,蓝图字节码的解释执行完全是有UObject这个巨大的基类来完成的;
- 每个字节码对应一个Native函数指针,通过
GNatives[ByteCode]查找、调用; - UObject通过解释执行蓝图脚本字节码,调用相应的C++实现的Thunk函数来完成具体的操作;